Tuesday, December 4, 2012

Mineral trioxide aggregate

Although the majority of practitioners will use calcium hydroxide routinely and effectively for pulp capping and various repairs to the root, Mineral trioxide aggregate (MTA) is increasingly used in specialist and some general practices. The material is described briefly in Part 5, and the application discussed in Part 11. Early research as a root-end filling material showed unparalleled results, and workers have since reported similar success in other endodontic procedures, with no resulting inflammation, and deposition of cementum over the restorative material.

MTA can be used in place of hard-setting calcium hydroxide in all these pulp-capping procedures.
Sunday, November 18, 2012

Partial pulpotomy

Although the technique of pulpotomy is indicated for immature teeth with open apices, as described in Part 10, it cannot be recommended routinely in mature teeth. However, the technique of partial pulpotomy (a procedure between pulp capping and pulpotomy) was introduced by Cvek and has been shown to be very successful in the treatment of traumatically exposed pulps.

The exposed pulp and surrounding dentine is removed under rubber dam isolation with a high-speed diamond drill and copious irrigation using sterile saline, to a depth of about 2 mm. Haemostasis is achieved and the wound dressed with a non-setting calcium hydroxide paste, either powder and sterile saline or a proprietory paste. The cavity is sealed with a suitable lining,

Thursday, November 8, 2012

Direct pulp capping

The aim of direct pulp capping is to protect the vital pulp which has been exposed during cavity preparation, either through caries or trauma.  The most important consideration in obtaining success is that the pulp tissue remains uncontaminated. In deep cavities, when an exposure may be anticipated, all caries should be removed before approaching the pulpal aspect of the cavity floor. If an exposure of the pulp occurs in a carious field the chances of successful pulp capping are severely compromised. A rubber dam should be applied as soon as pulp capping is proposed. The pulp should be symptom-free and uninfected, and the exposure should be small. Before commencing large restorations in suspicious teeth it may be prudent to test the vitality of the tooth with an electronic pulp tester, and also to expose a radiograph to ensure that there is no evidence of pulpal or periapical pathology. The radiograph may in fact be more valuable, as misleading results may occur when using an electric pulp tester on compromised multirooted teeth.

Wednesday, October 31, 2012

One-stage technique

The root canals are identified and instrumented to the working length estimated from a pre-operative radiograph. After drying the canals with paper points, formocresol is applied for up to 5 minutes. The root canals are then filled with a thin mix of zinc oxide–eugenol, using a rotary paste filler, and the restoration of the tooth is completed.

Thursday, September 6, 2012

External resorption

There are many causes of external resorption, both general and local. An alteration of the delicate balance between osteoblastic and osteoclastic action in the periodontal ligament will produce either a build-up of cementum on the root surface (hypercementosis) or its removal together with dentine, which is external resorption.

Resorption may be preceded by an increase in blood supply to an area adjacent to the root surface. The inflammatory process may be due to infection or tissue damage in the periodontal ligament, or, alternatively post-traumatic hyperplastic gingivitis and cases of epulis. It has been suggested that osteoclasts are derived from blood-borne monocytes. Inflammation increases the permeability of the associated capillary vessels, allowing the release of monocytes which then migrate towards the injured bone and/or root surface. Other causes of resorption include pressure, chemical, systemic diseases and endocrine disturbances.

Wednesday, September 5, 2012

Internal resorption

The aetiology of internal resorption is thought to be the result of a chronic pulpitis. Tronstad believes that there must be a presence of necrotic tissue in order for internal resorption to become progressive.

In most cases, the condition is pain-free and so tends to be diagnosed during routine radiographic examination. Chronic pulpitis may follow trauma, caries or iatrogenic procedures such as tooth preparation, or the cause may be unknown. Internal resorption occurs infrequently, but may appear in any tooth; the tooth may be restored or caries-free. The defect may be located anywhere within the root canal system. When it occurs within the pulp chamber, it has been referred to as  pink spot  because the enlarged pulp is visible through the crown. The typical radiographic appearance is of a smooth and rounded widening of the walls of the root canal. If untreated, the lesion is progressive and will eventually perforate the wall of the root, when the pulp will become non-vital (Fig. 7a). The destruction of dentine may be so severe that the tooth fractures.
The treatment for non-perforated internal resorption is to extirpate the pulp and prepare and obturate the root canal. An inter-appointment dressing of calcium hydroxide may be used and a warm gutta-percha filling technique helps to obturate the defect (Fig. 7b). The main problem is the removal of the entire pulpal contents from the area of resorption while keeping the access to a minimum. Hand instrumentation using copious amounts of sodium hypochlorite is recommended. The ultrasonic technique of root canal preparation may provide a cleaner canal as the acoustic streaming effect removes canal debris from areas inaccessible to the file. The prognosis for these teeth is good and the resorption should not recur.

Wednesday, January 18, 2012

Indirect pulp capping

The treatment of the deep carious lesion which has not yet involved the pulp has for some time been the subject of intense debate. Some researchers recommend the use of a calcium hydroxide lining to stimulate odontoblasts and increase dentine formation.4,5
Other workers have claimed that this does not occur.
Some workers still recommend that infected carious dentine is removed but a layer of softened sterile dentine may be left over the intact vital pulp.
Most endodontic texts, (for example, see References 9 and 10) recommend that all softened dentine should be removed and the pulp dealt with accordingly.

There is still controversy, however, over the correct treatment of a deep, caries free, cavity, lying close to the pulp. As alluded to in Part 1, the essential treatment is to ensure that there can be no bacterial contamination of the pulp via the exposed dentine tubules.

Tuesday, January 17, 2012

Radiographic appearance

A root canal filled with calcium hydroxide should appear on a radiograph as if it were completely sclerosed, as in Figure 4. The material is prone to dissolution, which would appear on a radiograph as voids in the canal. In the past, the addition of more radiopaque agents such as barium sulphate has been recommended. As these materials may be resorbed more slowly than the calcium hydroxide a false picture may be given, and this practice has largely been discontinued.

Monday, January 16, 2012

Powder liquid

The powder and liquid are mixed on a glass slab with a spatula to form a thick paste. Although sterile water may be used, local anaesthetic solution is more readily available in the surgery. The material may be applied using a spiral root canal filler as described earlier, however some practitioners prefer to use the small plastic tube with a long fine point illustrated in Part 7, Figure 14. The mixed material is loaded into the tube and extruded directly deep in the canal. 


A large paper point may again be used to condense the material further, and absorb excess water making the procedure easier and the filling more dense (Fig. 3). A firmer paste may be made by adding powder to a proprietary brand of calcium hydroxide paste. Of utmost importance in endodontics is the temporary coronal seal which prevents leakage and (re)contamination of the canal system. Intermediate restorative material (IRM), or 

Proprietary brands

The root canal system is first prepared and then dried. A spiral root canal filler is selected and passively tried in the canal. It must be a loose fit in the canal over its entire length, or fracture may occur, as seen in Figure 2. The working length of the canal should be marked on the shank with either marking paste or a rubber stop. The author prefers the blade type of filler as these are less prone to fracture. The paste of choice is spread evenly on the shank. 

The spiral filler is inserted into the canal and  wiped  around the walls to reduce air bubble formation. Using a standard handpiece with low rpm, the root canal is filled with paste. Several applications may be required. A large paper point may be used to condense the material into the canal, and this will also absorb

Friday, January 13, 2012

Routine canal medication

The indications for inter visit dressing of the root canal with calcium hydroxide have been considered in Part 7. There are two methods of inserting calcium hydroxide paste into the root canal, the object being to fill the root canal completely with calcium hydroxide so that it is in contact with healthy tissue. Care should be taken to prevent the extrusion of paste into the periapical tissues, although if this does occur healing will not be seriously affected.

Thursday, January 12, 2012

Clinical uses and techniques

The clinical situations where calcium hydroxide may be used in endodontics are discussed below and the techniques described. The method of application of calcium hydroxide to tissue is important if the maximum benefit is to be gained. When performing pulp capping, pulpotomy or treatment to an open apex in a pulpless tooth, the exposed tissue should be cleaned thoroughly, any haemorrhage arrested by irrigation with sterile saline and the use of sterile cotton wool pledgets. The calcium hydroxide should be placed gently directly on to the tissue, with no debris or blood intervening.

Presentation

Calcium hydroxide can be applied as a hard setting cement, as a paste or as a powder/liquid mixture, depending on the treatment. Various proprietary brands are available, (Fig. 1), although ordinary calcium hydroxide powder BP may be purchased from a chemist and mixed with purified water. Because of the antibacterial effect of calcium hydroxide, it is not necessary to add a germicide. The advantages of using calcium hydroxide in this form are that variable consistencies may be mixed and a pH of about 12 is achieved, which is higher than that of proprietary brands.

Wednesday, January 11, 2012

Mode of action

A calcified barrier may be induced when calcium hydroxide is used as a pulp-capping agent or placed in the root canal in contact with healthy pulpal or periodontal tissue. Because of the high pH of the material, up to 12.5, a superficial layer of necrosis occurs in the pulp to a depth of up to 2 mm. Beyond this layer only a mild inflammatory response is seen, and providing the operating field was kept free of bacteria when the material was placed, a hard tissue barrier may be formed. However, the calcium ions that form the barrier are derived entirely from the bloodstream and not from the calcium hydroxide.

The hydroxyl group is considered to be the most important component of calcium hydroxide as it provides an alkaline environment which encourages repair and active calcification. The alkaline pH induced not only neutralises lactic acid from the osteoclasts, thus preventing a dissolution of the mineral components of dentine, but could also activate alkaline phosphatases which play an important role in hard tissue formation.
The calcified material which is produced appears to be the product of both odontoblasts and connective tissue cells and may be
termed osteodentine. The barrier, which is composed of osteodentine, is not always complete and is porous. In external resorption, the cementum layer is lost from a portion of the root surface, which allows communication through the dentinal tubules between the root canal and the periodontal tissues. It has been shown that the disassociation coefficient of calcium hydroxide of 0.17 permits a slow, controlled release of both calcium and hydroxyl ions which can diffuse through dentinal tubules. Tronstad et al. demonstrated that untreated teeth with pulpal necrosis had a pH of 6.0 to 7.4 in the pulp dentine and periodontal ligament, whereas, after calcium hydroxide had been placed in the canals, the teeth showed a pH range in the peripheral dentine of 7.4 to 9.6.

Tuesday, January 10, 2012

CALCIUM HYDROXIDE

Calcium hydroxide was originally introduced to the field of endodontics by Herma in 1930 as a pulp-capping agent, but its uses today are widespread in endodontic therapy. It is the most commonly used dressing for treatment of the vital pulp. It also plays a major role as an intervisit dressing in the disinfection of the root canal system.

Endodontics: Part 9 Calcium hydroxide, root resorption, endo-perio lesions

For more than 70 years calcium hydroxide has played a major role in endodontic therapy, although many of its functions are now being taken over by the recently introduced material MTA. Calcium hydroxide may be used to preserve the vital pulp if infection and bleeding are controlled; to repair root fractures, perforations, open apices and root resorptions. Endo-perio lesions are complex and the correct diagnosis is essential if treatment is to be successful. However, root canal treatment will always be the first phase in treating such lesions.

OPEN APICES

The open apex, particularly in paediatric endodontics, can present a problem if it is too wide to permit the creation of a custom-fitted cone. A method of using the Obtura-II has been described whereby an increment of gutta-percha is applied to the canal close to the apex, and gently compacted with pluggers. 
A rapid-developing radiograph is exposed to verify the position of the apical seal, and further compaction carried out if required.

Sunday, January 8, 2012

CORONAL BACK-FILLING

The previously described System-B achieves an excellent and controlled obturation of the apical 5 7 mm of the root canal.  At this point the canal is quite wide, and can accept the tip of the Obtura s needle. A film of sealer is applied to the canal wall. The machine is heated to 200 C. A small amount of the warm gutta-percha should be extruded to warm the needle and discarded. The needle is then quickly introduced to the canal. If this part of the protocol is not followed, a void may result between the two parts of the filling. 
The trigger is activated and thermoplasticised gutta-percha extruded into the canal, gently pushing the needle out. Once the canal is filled conventional pluggers may be used to compact the gutta-percha,

Saturday, January 7, 2012

INJECTABLE GUTTA-PERCHA

Devices for injecting softened gutta-percha have been available for some time, but in the past have suffered from techniques which led to difficulty in accurate apical placement. The latest of these, the Obtura-II, has recently gained acceptance by endodontists. The machine resembles a glue-gun. Pellets of alpha-phase gutta-percha are softened at about 200 C in the handpiece, and extruded through a heated silver needle (Fig. 11). 
A wide, well-prepared canal is a prerequisite. Although the manufacturers describe a procedure for total obturation of a root canal, apical control can be difficult. The machine has become accepted for two specific procedures.

Friday, January 6, 2012

VERTICAL COMPACTION OF WARM GUTTA-PERCHA

Heated gutta-percha has been shown to flow extremely well into all canal irregularities. It is particularly useful in situations such as internal resorption, C-shaped canals, and those with fins or webs. As referred to earlier, when the smear layer is removed the gutta-percha has been shown to penetrate dentine tubules.
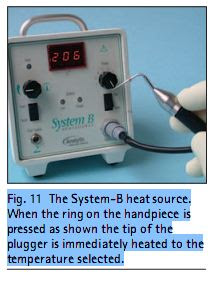
Fig. 11  The System-B heat source. When the ring on the handpiece is pressed as shown the tip of the plugger is immediately heated to the temperature selected.

This technique is now considered the gold standard for endodontic obturation. The principle of vertical compaction of increments of warm gutta-percha was first described by Schilder in 1967.
Although delivering excellent results, the method was difficult to master and time-consuming.
The state of the art at present is the method first described by Buchanan employing the System-B heat source (Fig. 11), which delivers a precise heat to the tip of the plugger.

Monday, January 2, 2012

HEATED GUTTA-PERCHA CARRIERS

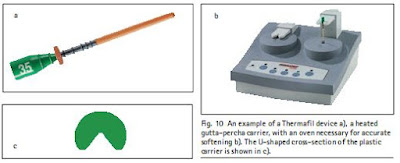
Several manufacturers now supply these devices, illustrated in Figure 10. Alpha-phase gutta-percha is attached to a rigid carrier, in a variation of the technique originally described by Johnson in 1978.
Fig. 10  An example of a Thermafil device a), a heated gutta-percha carrier, with an oven necessary for accurate softening b). The U-shaped cross-section of the plastic carrier is shown in c)
Most carriers are now plastic. The excess material is removed, and the carrier remains in the canal as a central core. The softened gutta-percha flows well in to canal aberrations, fins, etc., giving very good threedimensional obturation.

Success depends, as with all techniques, upon thorough canal cleaning and shaping. The carriers have a 4% taper, and an underprepared canal will be difficult if not impossible to obturate to working length with these devices. A range of sizes is presented, and most systems employ a method of ensuring the fit of the device before obturation is commenced. This may either be a blank carrier with no gutta-percha attached, or preferably a file of the same dimensions as the carrier. The apical preparation may then be refined to ensure an accurate fit of the device.
The canal should be cleaned and dried, and a very fine coating of sealer applied to the canal orifice only. Excess sealer may be extruded under hydraulic pressure through the apical foramen, with resultant pain and inflammation.  In the

Fig. 10  An example of a Thermafil device a), a heated gutta-percha carrier, with an oven necessary for accurate softening b). The U-shaped cross-section of the plastic carrier is shown in c).
meantime the rubber stop on the selected device is set to working length, and the device placed in a special oven to soften the gutta-percha. When ready, the device should be swiftly and smoothly inserted to working length, and held in place for a few seconds. Using a high-speed bur the excess carrier may be sectioned and removed from the canal orifice, and a plugger used to compact the gutta-percha in this area. A layer of resin-modified glass ionomer completes the obturation.

Sunday, January 1, 2012

THERMATIC COMPACTION OF GUTTA-PERCHA

In 1979, McSpadden devised a handpiece driven compactor, which is effectively an inverted Hedstroem file.
Fig. 9  a) Maillefer Gutta Condensors, with b) showing the apically directed thread structure.
Although no longer made, other similar devices, such as the gutta condensor (Fig. 9), are available. The frictional heat from the compactor plasticises the gutta-percha and the blades drive the softened material into the root canal under pressure. The main problem found was lack of control over the apical portion of the gutta percha, which may be extruded through the apex in its softened state. To overcome this problem, the technique was modified by Tagger, who recommended laterally condensing a master point and two or three accessory points, and then using the condensor to plasticise the gutta percha in the coronal part of the canal.