Wednesday, November 30, 2011

APPLICATION TECHNIQUES Winged technique

Fig. 11  The winged technique. The hole in the rubber sheet has been stretched over the wings of the clamp a), which is then fitted to the tooth b). The rubber is pushed off the wings, and the seal verified.
A well-trained dental nurse and a well organised surgery, are essential for efficient application of the rubber dam. If a tray is prepared with ready punched sheets, and sterilised clamps already flossed, application can be performed in a matter of seconds.
There are three standard methods of application, described and illustrated here.


Winged technique
The appropriate winged clamp (8A for molars, 1 for premolars) is selected and flossed. The rubber dam is punched and aligned with the quadrant to be treated. The clamp is held in the forceps and retained with the ratchet. The hole in the rubber is stretched across the wings of the clamp, positioning the bow of the clamp towards the back of the arch. All this may be done by the dental nurse while the dentist is otherwise occupied,

The rubber dam frame

Fig. 10  The rubber dam frame may be easier to place beneath the rubber sheet.

The old Ash frame, with its  butterfly  retainers, has largely been replaced by plastic or metal frames with sharp points or pins. It should be noted that the majority of these retentive points slope backwards, and the frames are designed to be placed under the rubber dam (Fig. 10). It seems to be much easier to place the frame beneath the dam and simply stretch the sheet over the points than the other way round. In addition, the tension in the sheet can be better controlled, particularly relevant when working in a situation where the clamp may be less retentive than normal.

Endodontics: Part 7 Preparing the root canal

Success in endodontic treatment depends almost completely on how well the root canal is shaped and cleaned. This part will cover the principles of root canal preparation, irrigation, root length determination, intracanal medication, and temporary fillings.
There have been more developments in recent years in this aspect of endodontic practice than any other. New instruments have been developed, employing different metals and different engineering philosophies. There has been a significant move away from the ISO standard 2% taper instrumentation.

Rubber dam forceps

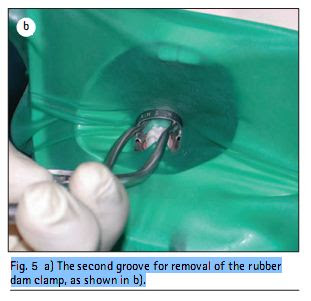
Fig. 5  a) The second groove for removal of the rubber dam clamp, as shown in b).


The rubber dam forceps are used to carry the clamp to the tooth. The most frequently reported problem with rubber dam is that when the clamp has been expanded and placed on the tooth, the forceps are stuck in the clamp and cannot be removed! This is because the grooves in the tips of the forceps are too deep. These should be modified with a stone or sandpaper disc so that they just engage the clamp, but slide off easily. Most forceps have a second groove slightly distant from the tip, which may be used to remove the rubber dam clamp without re-engaging the holes (Figs 4 and 5).

Split dam

Occasionally, a broken down tooth may be isolated using a slit cut between the holes made for the two adjacent teeth, as shown in Figure 16. It is essential that the caulking material illustrated in Figure 9 is applied to prevent leakage and contamination.

Finally, if an operator decides to proceed with root canal treatment without the use of rubber dam, each hand file must be protected with either floss tied around the handle or an appropriate safety device. The excess saliva must be controlled with cotton wool rolls and aspiration, and great care must be taken with medicaments. It would be advisable to inform the patient of the risks involved, and the reduced prognosis for the treatment if

Rubber dam clamps

There is a vast range of shapes and sizes of rubber dam clamps, supposedly to suit every possible tooth and situation. In fact, this merely causes confusion, as an ill-fitting clamp may be quite unsatisfactory, and dislodge during treatment. When properly fitted, a clamp should have four point contact with the tooth. If not, it will either rock back and forward or dislodge completely.
Fig. 9  a) A caulking agent which may be used to seal voids around the rubber dam that may allow salivary contamination, as shown in b).

Clamps are described as being either  active , where the jaws slope downwards and positively slide into cervical undercuts, or  passive  when they tend to remain where placed. They may also be either winged or wingless, depending upon the chosen method of application.
The size 8A clamp is described by the manufacturers as a  universal retentive molar clamp .It is an active clamp, and fits every molar tooth, even when these are quite broken down. The author would suggest therefore that all the other designs merely confuse the issue, and until the operator is very experienced only this clamp is used for all molar teeth. Likewise, the size 1 fits virtually all premolars (Fig. 6). If passive clamps are preferred size 0 or 00 are suitable for premolars, although they will not be as retentive. Rather than place aggressive clamps on anterior teeth, it is usually kinder to use interproximal wedges, either pieces of rubber dam or a commercial product such as  Wedgets  (Fig. 7). It is often easier to isolate several anterior teeth, giving a clear operating field.

Rubber dam stamp

Fig. 3  For multiple isolation, the position of the holes to be punched may be marked by holding the rubber dam against the teeth.

This is another piece of equipment now largely superseded. For single tooth isolation, a hole punched 2 cm diagonally from the middle of the sheet gives universal dam. The hole is simply orientated to the quadrant under treatment. For multiple isolation, it is preferable to hold the dam against the teeth to be isolated, and mark the centre of each tooth with a pen, as shown in Figure 3. The holes will then be punched in accordance with the patient s dentition and not with an arbitrary stamp. 

Tuesday, November 29, 2011

Rubber dam punch


Fig. 3  For multiple isolation, the position of the holes to be punched may be marked by holding the rubber dam against the teeth.
Much of the equipment for rubber dam has been rationally modified. The revolving plate on the old punch was rarely used, as a single size hole will really fit all teeth. When the table was moved it frequently led to eccentric wear of the pin, which then did not cut a clean hole. The defect in the cut may cause the dam to split when stretched out. The new rubber dam punches are single table (Fig. 2) and should always cut a clean hole.